Text files are simple, plain-text documents that store data in a structured or unstructured format. They are widely used for a variety of purposes, such as configuration settings, data logging, and data interchange between different systems. Text files are particularly useful for storing large datasets that can be easily read by both humans and machines. However, when it comes to data manipulation, analysis, or secure storage, a text file may not be the most efficient or secure medium. This is where MySQL databases come into play. Importing text files into a MySQL database allows for more robust data management capabilities, including querying, indexing, and transaction handling. In this article, we will explore several methods to import text files into MySQL databases, discussing their advantages and limitations to help you choose the best approach for your needs.
Preparing the Text File
Before you even touch a MySQL command, the first crucial step in importing data into a MySQL database is preparing your text file. This text file serves as the data source that you’ll be importing, and its structure is not to be taken lightly. In this section, we’ll delve into the importance of data structure, column compatibility, and the role of field delimiters, all illustrated with an example text file.
Importance of Data Structure
The structure of your text file is foundational to the success of your data import. A well-structured file ensures a smooth, error-free import, while a poorly structured one can lead to data corruption and a host of other issues. For example, consider a text file (employee_data.txt) with the following content:
|
emp_id,first_name,last_name,department,salary |
Here, the text file is structured to match a MySQL table schema that includes columns for emp_id, first_name, last_name, department, and salary. This alignment sets the stage for a successful data import.
Creating the MySQL Table
After preparing your text file, the next pivotal step in the data import process is creating a MySQL table that aligns perfectly with your data source. This involves thoughtful table schema design, selecting appropriate data types for each column, and naming your columns in a way that facilitates easy mapping to the text file. Let’s delve into each of these aspects.
Table Schema Design
Designing a table schema that is compatible with your text file is not just a good practice—it’s a necessity for a seamless data import. The table schema serves as a blueprint for how your data will be stored in the MySQL database. It defines the structure, constraints, and relationships of the data. If the table schema doesn’t align with the text file, you risk running into errors during the import process, which can be time-consuming to debug.
A compatible MySQL table schema might look like:
|
CREATE TABLE employees ( |
Data Types
Choosing the right data types for your columns is crucial for maintaining data integrity. Data types define the kind of data that can be stored in each column, and they need to be compatible with the data in your text file. For instance, if a column in your text file contains numerical data, then the corresponding MySQL table column should have a numerical data type like INT or FLOAT.
In our example, the emp_id and salary columns contain numerical data, so we’ve chosen the INT data type. For columns like first_name, last_name, and department, which contain textual data, we’ve chosen the VARCHAR data type.
Column Names
Naming your columns appropriately is more than just a matter of readability or convention. The column names in your MySQL table should be easily mappable to those in your text file. This makes it easier to write the “LOAD DATA” statement and minimizes the chance of errors due to column mismatches.
In our example, the column names in the MySQL table schema (emp_id, first_name, last_name, department, salary) directly match those in the employee_data.txt file. This straightforward mapping ensures that the “LOAD DATA” statement can be written without any additional column mapping configurations.
In conclusion, creating a MySQL table that aligns with your text file involves thoughtful schema design, appropriate data type selection, and careful naming of columns. Each of these elements plays a crucial role in ensuring a successful and error-free data import. By paying attention to these details, you set the stage for efficient and reliable data management in your MySQL database.
Import Using MySQL Command-line Client
Once your text file is prepared and your MySQL table is set up, the next step is to actually import the data. One of the most straightforward ways to do this is by using the MySQL command-line client. In this section, we’ll guide you through logging into the MySQL command-line client, provide a detailed breakdown of the “LOAD DATA” statement, and explain how to interpret output messages to confirm a successful data import.
Logging into the MySQL Command-line Client
The first step in the import process is to log into the MySQL command-line client. This is the interface where you’ll execute SQL commands to interact with your MySQL database. To log in, open your terminal and enter the following command:
mysql -u [username] -p
After hitting enter, you’ll be prompted to enter the password for the specified username. Once authenticated, you’ll be taken to the MySQL command-line interface, ready to execute SQL commands.
Understanding the “LOAD DATA” Statement
The “LOAD DATA” statement is the workhorse for importing text files into MySQL tables. Its syntax includes several components that need to be specified correctly for a successful import. Here’s a generic example:
LOAD DATA INFILE ‘path/to/your/textfile.txt’ INTO TABLE your_table_name
FIELDS TERMINATED BY ‘,’
LINES TERMINATED BY ‘n’;
INFILE ‘path/to/your/textfile.txt’: Specifies the full path to the text file you want to import.
INTO TABLE your_table_name: Indicates the target MySQL table where the data will be imported.
FIELDS TERMINATED BY ‘,’: Specifies the field delimiter used in your text file (in this case, a comma).
LINES TERMINATED BY ‘n’: Specifies the line delimiter used in your text file (in this case, a newline character).
For our example text file (employee_data.txt) and table (employees), the “LOAD DATA” statement would look like this:
|
LOAD DATA INFILE ’employee_data.txt’ INTO TABLE employees |
Interpreting Output Messages
After executing the “LOAD DATA” statement, MySQL will provide output messages that can help you confirm whether the data import was successful. A typical successful import will display a message like:
Query OK, 3 rows affected (0.01 sec)
This message indicates that the query was executed successfully and specifies the number of rows that were affected (or imported, in this case). If you see this message, you can be confident that your data has been successfully imported into the MySQL table.
In summary, importing data using the MySQL command-line client involves logging into the interface, executing the “LOAD DATA” statement with the correct syntax, and interpreting output messages to confirm a successful import. Each of these steps is crucial for ensuring that your data is accurately and efficiently imported into your MySQL database.
Import Using GUI Tool for MySQL
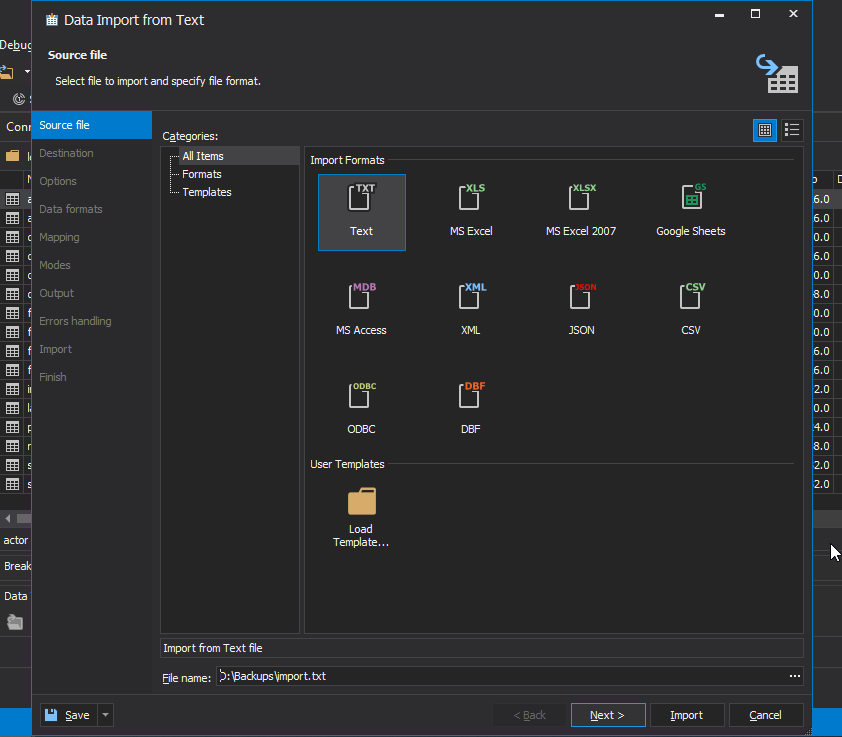
While the MySQL command-line client is a powerful tool for data import, graphical user interface (GUI) tools offer a more user-friendly experience. Popular options include MySQL Workbench and phpMyAdmin. However, for the purpose of this tutorial, we’ll focus on dbForge Studio for MySQL, a comprehensive tool that simplifies various database management tasks, including data import.
Advantages of dbForge Studio for MySQL
dbForge Studio for MySQL offers several advantages over other GUI tools:
User-Friendly Interface: A clean and intuitive interface that makes navigation and task execution straightforward.
Advanced Data Import Wizard: A step-by-step guide that offers flexibility in how you import your data.
Bulk Data Import to MySQL: One of the standout features is the ability to automate data import processes using command-line options. This is particularly useful for frequent data imports to the same table or view.
Error Handling: Robust error handling features, including detailed log files to help you troubleshoot issues.
Data Mapping: Allows for automatic or manual mapping of source columns to target columns, providing greater control over data import.
Walkthrough for Importing Data Using dbForge Studio for MySQL
Here’s a step-by-step guide to importing data into MySQL using GUI tool:
Decide What Table to Import Data To
For a New Table: Go to the Database menu and click “Import Data” to open the Data Import wizard.
For an Existing Table: Right-click a table in Database Explorer and select “Import Data.” The Data Import wizard will open with predefined parameters.
Select Text Import Format and Source Data Location
Choose the text import format and specify the location of your source data. Click “Next.”

Specify MySQL Connection Details
Enter the MySQL connection, database, schema, and table details. Click “Next.”

Choose How to Split Source Data into Columns
Manual: Double-click desired positions in the Preview section to set column ranges.
Fixed Width: Specify a width value.
Text Separator: Specify a column separator.
Customize Additional Import Options
Specify any additional options to customize the import. Click “Next.”
Specify Data Formats for Source Data
Choose the data formats for your source data and click “Next.”

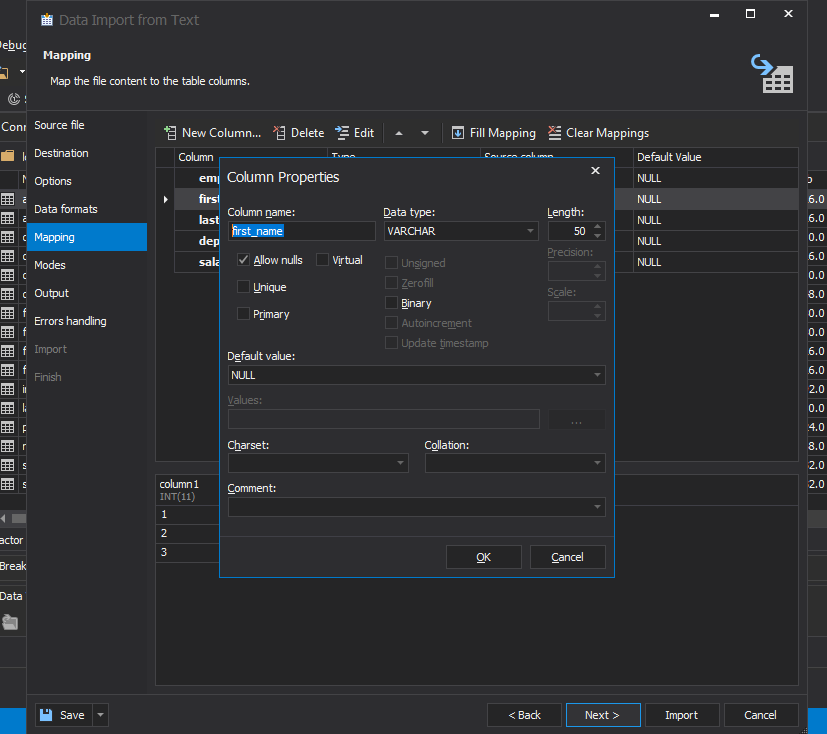
Map Source Columns to Target Columns
Map the source columns to the target ones. If you’re importing into a new table, dbForge Studio will automatically create and map all the columns.

Edit Target Column Properties
If you’re importing to a new table, you can edit the target column properties. Make sure to select at least one column with a primary key.

Select Import Mode
Choose how dbForge Studio should import the data. Click “Next.”

Handle Errors and Logs
Select how dbForge Studio should handle errors and whether you want a log file.

Start the Import
Click “Import” and monitor the progress. You’ll be notified upon completion.
Finish the Import
Click “Finish” to complete the import and close the wizard.

By following these steps, you can easily import data into a MySQL database using dbForge Studio for MySQL, taking advantage of its user-friendly interface and robust features.
Conclusion
In this guide, we’ve delved into two viable strategies for importing data from text files into a MySQL table: utilizing the MySQL command-line client and leveraging the capabilities of dbForge Studio for MySQL. While the command-line offers a robust, script-driven method, dbForge Studio delivers a more intuitive, step-by-step process. Both approaches have their advantages, but the secret to a seamless import is following best practices. This entails having a well-organized text file, setting up a MySQL table that aligns with it, and meticulously mapping source to target columns to maintain data integrity and efficiency. Adding to this, dbForge Studio for MySQL also offers the unique feature of Bulk Data Import, allowing for automated, frequent imports via command-line options. For a holistic, user-friendly solution for data import and broader database management tasks, we strongly encourage you to try out dbForge Studio for MySQL through its free trial.


