Your iPhone probably knows more about you than some of your friends—and a lot of apps are quietly trying to know even more.
From banking apps and work emails to family photos and private DMs, your iPhone is packed with sensitive info. Apple does a lot behind the scenes to keep things safe, but your privacy settings, notifications, and app permissions still decide how much you’re actually sharing. The good news? You don’t need to be “good with tech” to lock things down—you just need to tap the right switches.
In this guide, we’ll walk through simple, non-technical iPhone privacy hacks that anyone can do in a few minutes: tightening your lock screen, stopping creepy app tracking, cleaning up permissions, protecting photos and notes, and cutting down on scams and snoops. By the end, you’ll have a phone that still works the way you like—just a lot more private.
Who This Guide Is For (And Why Your iPhone Needs It)
This guide is for you if any of these sound familiar:
- You use your iPhone for work, banking, and personal life all in one place.
- You lend your phone to kids, friends, or coworkers sometimes.
- You’ve seen too many scam messages and fake “delivery” texts lately.
You might think, “Apple already cares about privacy, so I should be fine, right?”
Yes and no.
Apple gives you strong foundations: encrypted iMessages, secure Face ID, on-device processing for things like Face ID and Siri. But there are still a lot of open doors you control:
- Which apps can track you across other apps and websites.
- Which apps can see your location, microphone, or all your photos.
- How much information strangers can read from your lock screen.
- How easy it is for a scam link or fake login to trick you.
If you’re already worried that something might be wrong with your device, you can also check this step-by-step guide on how to tell if your iPhone is hacked to quickly spot any red flags before you continue.
Think of this article as a privacy clean-up. You’re not tearing the house down; you’re closing windows, locking doors, and putting the valuable stuff in safer places—without making your daily life annoying.
Step 1 – Start With an iPhone Privacy Checkup
Before you tweak individual settings, it’s smart to fix the basics. These are the “front door” security moves.
Keep iOS Up to Date
Updates aren’t just about new emojis. Many of them quietly fix security holes that hackers and malware try to exploit.
Open Settings, scroll to General, then Software Update. If there’s an update available, install it when you don’t need your phone for a bit. While you’re there, turn on Automatic Updates so you’re not relying on memory.
This one change alone closes a lot of potential risks.
Use a Real Passcode, Not “000000”
Face ID or Touch ID is great, but your passcode is still the key to everything. If your code is something like 123456, 000000, or your birthday, it’s basically a welcome mat.
In Settings, go to Face ID & Passcode (or Touch ID & Passcode) and change to at least a 6-digit code. Even better, choose the Custom Alphanumeric Code option if you can remember a short phrase or word combined with numbers.
While you’re on this screen, look at:
- Require Passcode – set it to immediately or after 1 minute.
- Allow Access When Locked – turn off anything you don’t want visible without unlocking (like Wallet, Home Control, Reply with Message).
This is the difference between someone seeing “just your notifications” and someone seeing previews of your emails, messages, and OTP codes.
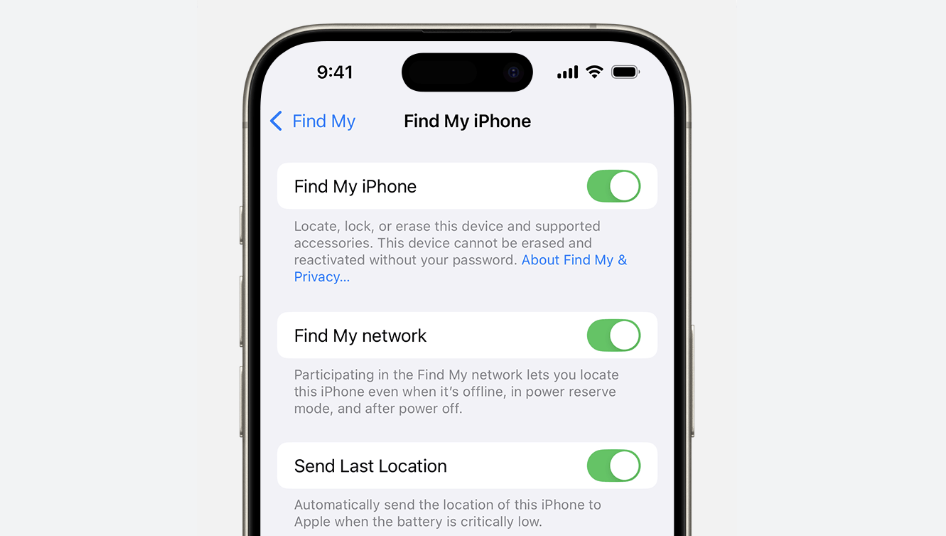
Turn On Find My iPhone
Losing your phone is bad. Losing it without a way to track or erase it is much worse.
Open Settings, tap your Apple ID name at the top, then Find My and make sure Find My iPhone is turned on. Also enable Find My network and Send Last Location so your phone can still be found if the battery is almost dead.
If your iPhone ever goes missing, you can use another device or iCloud on a browser to locate, lock, or erase it remotely.
These three moves—updates, passcode, and Find My—are your starting checklist. Once they’re solid, you can get into the more interesting “hacks”.
Step 2 – Stop Apps From Tracking and Listening In
Now we deal with what most people are really worried about: apps knowing too much.
Kill Unnecessary Tracking
Apple’s App Tracking Transparency gives you more control, but you have to actually use it.
Go to Settings > Privacy & Security > Tracking. You’ll see a main switch called Allow Apps to Request to Track.
If you’re not sure you trust most apps, simply turn this off. That blocks apps from tracking you across other apps and websites for advertising profiling.
If you leave it on, scroll through the list below. Any app that doesn’t need to track you (which is most of them) can be switched off individually. Social media, random games, or shopping apps usually don’t deserve this level of access.
Audit Camera, Microphone, and Location
Still under Privacy & Security, open Location Services. You’ll see a long list of apps that have asked for your location.
Ask yourself one question for each app: Does this app truly need my location to work? Maps and ride-hailing apps obviously do. A calculator? Not so much.
For most apps, “While Using the App” is enough. Very few deserve “Always”. If you’re unsure, choose Ask Next Time Or When I Share so you stay in control.
Do the same kind of review for Microphone and Camera in the Privacy & Security menu. Apps that genuinely need the mic or camera (video calls, camera, voice memos) are fine. A random game or wallpaper app probably doesn’t.
Control What Apps See in Your Photos
Many people don’t realize they can limit photo access to selected photos instead of their entire library.
Under Privacy & Security, tap Photos. For any app you don’t fully trust, change access to Selected Photos. Next time you open the app, pick only what it truly needs.
This simple tweak stops an app from silently scanning your whole photo history, which often includes IDs, documents, kids, travel details, and more.
Delete Apps You Don’t Use
Old apps are like old keys you forgot to take back. They still fit the lock.
Take a moment on your home screen: long-press an app icon and choose Remove App. If you’re hesitant, you can choose Offload App in Settings > General > iPhone Storage, which removes the app but keeps its data.
If you haven’t used an app in months and don’t trust the brand, it’s usually safer to delete it completely.
Step 3 – Lock Down Messages, Mail and Browsing
Now that your apps are more under control, let’s deal with how your communication is exposed.
Hide Sensitive Previews on the Lock Screen
Lock screen previews are convenient, but they can show bank codes, private messages, and work emails to anyone nearby.
Open Settings > Notifications, then pick apps like Messages, Mail, WhatsApp, and other chat apps. Under Show Previews, choose When Unlocked or even Never if you prefer.
This way, your lock screen may still show that a message arrived, but not the actual content. Anyone who glances at your phone will see far less.
Add a Layer of Protection to Your Apple ID
Your Apple ID controls backups, App Store purchases, and more. If someone gets into that, they get into everything.
In Settings, tap your name, then go to Password & Security. Make sure Two-Factor Authentication (2FA) is turned on. This adds a code step when logging in from a new device, making it much harder for someone to break in with just your password.
While you’re there, review your trusted devices. If there’s a device you don’t recognize, remove it.
Use Safari’s Built-In Privacy Settings
Open Settings > Safari and scroll a bit. Turn on:
- Prevent Cross-Site Tracking – limits how advertisers follow you around.
- Hide IP Address from Trackers – reduces how easily you’re profiled.
- Consider using Fraudulent Website Warning if it’s not already on.
Whenever Safari suggests a strong password, don’t ignore it. Let iCloud Keychain store it. It’s much safer than reusing the same old password everywhere.
Mail apps also often have a privacy section in their settings where you can hide your IP address and prevent tracking pixels from reporting when you open an email. It’s worth turning those on; your inbox doesn’t need extra spying.
Step 4 – Protect Your Photos, Files and Notes
For most people, photos and notes are the real heart of the phone. That’s where memories, documents, and personal details live.
Use Hidden and Locked Albums Properly
Open the Photos app and you’ll see a Hidden album and a Recently Deleted album. In Settings > Photos, you can turn Hidden Album on or off in the main view. On newer iOS versions, Hidden and Recently Deleted can also be locked with Face ID or Touch ID.
The key idea:
- Keep ordinary photos in your main library.
- Move anything sensitive—IDs, tickets, screenshots of bank info—into Hidden.
- Remember that Recently Deleted is also a target; clear it if you’ve just wiped something sensitive.
This isn’t bulletproof security, but it stops casual snooping when someone is just flipping through your gallery.
Lock Your Most Sensitive Notes
The Notes app is underrated as a secure space.
Open a note, tap the three dots, and choose Lock. You can protect notes with your device passcode or Face ID. Use locked notes for things like:
- Scans of passports and IDs.
- Medical info and personal documents.
- Private lists or thoughts you don’t want anyone reading.
Avoid storing passwords in random notes, though. Use iCloud Keychain or a reliable password manager for those.
Be Smart About iCloud and File Sync
Open Settings, tap your name, then iCloud. Check what’s being synced: Photos, Notes, Files, and backups.
Cloud sync is convenient and usually safe, but you should still understand what’s going up there. If there are things you absolutely never want in the cloud, keep them in local, locked notes or don’t store them on your phone at all.
The goal isn’t to stop using the cloud; it’s to know which things live there and which don’t.
Step 5 – Cut Down on Scams, Snoops and Annoyances
Even with strong settings, the number one threat is often social engineering—tricks that push you into tapping the wrong thing.
Silence Unknown Callers and Obvious Spam
If you get a lot of random calls, try Settings > Phone > Silence Unknown Callers. Legit contacts will still get through, and unknown numbers go to voicemail.
Many messaging and email apps also have spam filters or “junk” categories. Use them. Report spam when you see it so future messages from that sender get blocked.
Learn the Red Flags of Scam Messages
Most scams follow the same patterns:
- “Your package is delayed, click here.”
- “Your bank account is locked, verify now.”
- “You won a prize, claim it within 24 hours.”
Train yourself (and your family) to never tap these links directly. Instead, go to the official app or website manually, or call the company using a number you trust—not the one in the message.
If something feels urgent and scary and asks for passwords, codes, or money, treat it as suspicious by default.
What to Do If You Clicked Something Sketchy
It happens. If you tapped a weird link:
- Close the page or app immediately.
- Don’t enter any passwords or codes.
- Change the password for whatever account was involved (bank, email, Apple ID).
- Turn on or double-check two-factor authentication if you haven’t already.
- Keep an eye on your bank statements and inbox for anything unusual.
If you think your Apple ID is compromised, go to Settings > [your name] > Password & Security and change your password right away. You can also review devices logged into your account and sign out anything unfamiliar.
Step 6 – Extra Safety for Parents and Professionals
Some people need a little more than the basics. If you manage sensitive work data or you let kids use your phone, this part is for you.
Screen Time and Kid-Friendly Settings
If your child has their own device, set it up as a child account under Family Sharing, then go to Settings > Screen Time on their device or yours.
You can:
- Limit app usage by category (games, social media).
- Block explicit content in Safari and media.
- Require approval for app downloads and in-app purchases.
If kids sometimes borrow your phone, you can still use Screen Time to set up Content & Privacy Restrictions so they can’t install apps, change accounts, or access adult content without your say-so.
It’s not about spying on your kids; it’s about making sure one YouTube session doesn’t lead to something they’re not ready to see.
Separate Work and Personal as Much as Possible
If you use your iPhone for work, try to draw a soft line between your personal life and your job.
Set up separate Mail, Calendar, and Notes accounts for work and personal. Many companies also provide their own secure apps or Mobile Device Management (MDM) tools. Use them if required—they usually add protection rather than taking it away.
When you leave a job, make sure you remove the work account from your phone so old employers can’t still manage or wipe your device.
When to Consider “Advanced” Protections
Most people don’t need hardcore security features, but some do—journalists, activists, high-profile executives, or anyone handling very sensitive information.
If you think you might be a higher-risk target, talk to a security professional or follow Apple’s official guidance for features like Lockdown Mode. The key is to use trusted, official advice—not random “hacks” from social media.
Quick Privacy Routine: 10-Minute Monthly Checklist
Privacy isn’t something you fix once and forget forever. Apps update, new services appear, and life changes. The good news is that a 10-minute monthly check is enough for most people.
Here’s a simple routine you can bookmark and repeat:
- Check for iOS updates and install them if available.
- Review new apps you’ve installed: do they really need location, camera, or microphone?
- Glance at Notifications and lock screen previews for messaging and email apps; adjust if something feels too revealing.
- Clear out old apps you haven’t used in months. If you don’t trust them, delete, don’t just offload.
- Review passwords for key accounts—email, banking, Apple ID—and make sure 2FA is turned on wherever possible.
- Empty Recently Deleted in Photos, especially if you removed sensitive images.
That’s it. Ten minutes, once a month, and you stay far ahead of the average person when it comes to iPhone privacy.
Remember: you don’t need to be paranoid, and you don’t need to turn your phone into a brick that can’t do anything. You just need to tighten a few settings, build a handful of habits, and stay a little bit skeptical of anything that feels too urgent or too good to be true.
Do that, and your iPhone can go back to being what it was meant to be—a useful tool you control, not a window into your life for everyone else.